HomeBlog / Articles

How to adjust suspension on an enduro motorbike in the UAE

How to adjust suspension on an enduro motorbike in the UAE

Learn how to adjust suspension on your enduro motorbike for the terrain in the UAE. Step-by-step guide covering forks, rear shock, and sag settings.

10 Jul 2026

How to adjust suspension on an enduro motorbike in the UAE

You don't need to be a world-class enduro racer to know how to adjust enduro suspension. This is a basic skill every rider can easily learn. If your bike kicks your hands on bumps, bottoms out on jumps, or feels nervous on rough ground, it's probably time to pick up the tools and start adjusting.

This quick enduro suspension setup guide explains the main settings that apply to most enduro off-road bikes for sale. Exact values can differ from model to model. The number of clicks for compression, rebound, or the correct sag measurement should always be checked in your owner's manual.

What is suspension and why do you need to adjust it?

Suspension connects the wheels of an enduro bike to its frame. Both the front and rear suspension work through the same basic idea: a spring, oil, and internal valves. The spring supports the bike's weight and affects height, while the oil and valves control how fast the suspension compresses and returns after a hit.

So, what does suspension actually do? First, it helps the wheels stay in contact with the ground when riding on bumpy surfaces or during landings. Second, it absorbs bumps so the bike does not bottom out too easily or bounce back too aggressively. Third, it keeps the rider in control. A good setup should not kick you out of the seat or make the handlebars feel like they are fighting your hands.

Suspension setup usually includes several steps: preparation, setting the sag, adjusting compression, adjusting rebound, and then making small final corrections after a test ride. Once you understand what each setting does, enduro suspension tuning becomes much less intimidating.

Common types of enduro suspension

The enduro motorbike suspension setup differs from model to model. Some bikes are simple and do not offer much room for adjustment. Others are built for harder riding and give you more ways to fine-tune the setup.

Front suspension types

  • Conventional telescopic fork — the simplest type of an enduro fork setup, often found on entry-level or beginner-friendly bikes.
  • Inverted fork / USD fork — a stronger and more precise design, commonly used on sportier enduro and off-road bikes.
  • Adjustable fork — a fork that lets you adjust rebound, compression, or sometimes preload, depending on the model.
Front suspension types

Rear suspension types

  • Basic rear shock — usually the simplest setup, often with spring preload adjustment only.
  • Adjustable rear shock — can include rebound and compression settings, giving the rider more control over how the bike reacts.
  • Advanced shock with reservoir — made for harder riding, better heat control, and more stable damping during long or aggressive off-road sessions.
Rear suspension types

What suspension settings can you adjust?

Before you start changing anything, it helps to understand the four main suspension settings. These are the basics behind any enduro suspension setup guide.

  1. Spring rate is the actual stiffness of the spring. A softer spring compresses more easily, while a stiffer spring holds the bike higher and resists bigger hits better. Spring rate is usually chosen based on rider weight and riding style, and it is not something you change with a few clicks.
  2. Spring preload is the initial tension applied to the spring. It does not make the spring itself "stronger," but it changes how much the bike sits down under its own weight and under the rider. This is directly connected to sag, so it is one of the first things to check during setup.
  3. Rebound damping controls how fast the suspension returns after a hit. If rebound is too fast, the bike feels bouncy. If it is too slow, the suspension may not return in time before the next bump.
  4. Compression damping controls how fast the suspension compresses when the wheel hits a bump, rut, rock, or landing.

After understanding what the suspension is made of and what each setting does, the next step is to create a basic setup for yourself. For enduro suspension for beginners, the best approach is simple: start with the manual settings, adjust sag first, then make small changes one at a time.

Step 1. Prepare the bike before adjustment

Good enduro suspension tuning starts with preparation. Before turning any clickers or preload rings, make sure the bike is ready.

You'll need basic adjustment tools, a tape measure or ruler, and a notebook to record changes. A helper is useful for sag measurements, because the bike must stay straight while you sit on it.

Find a flat, level surface and wear your usual riding gear. Helmet, boots, protection, backpack, and tools all add weight, so they affect the final setup. Let the bike stand for 10–15 minutes before measuring, so the suspension is cold.

Before adjusting anything, press down on the bike and check that the suspension moves smoothly. If you hear knocking, feel sticking, or see oil leaks around the fork or rear shock, don't tune it yet. The suspension needs service first.

Step 2. Set the sag

Sag shows how much the bike settles down under its own weight and the rider's weight. If the sag is wrong, other adjustments will not work properly.

So, why is it so important? Sag gives the suspension room to work in both directions: upward when it compresses over bumps, and downward when the wheel drops into holes, ruts, or uneven ground. If there is too much or too little sag, the suspension loses part of that working range, and the bike becomes harder to control.

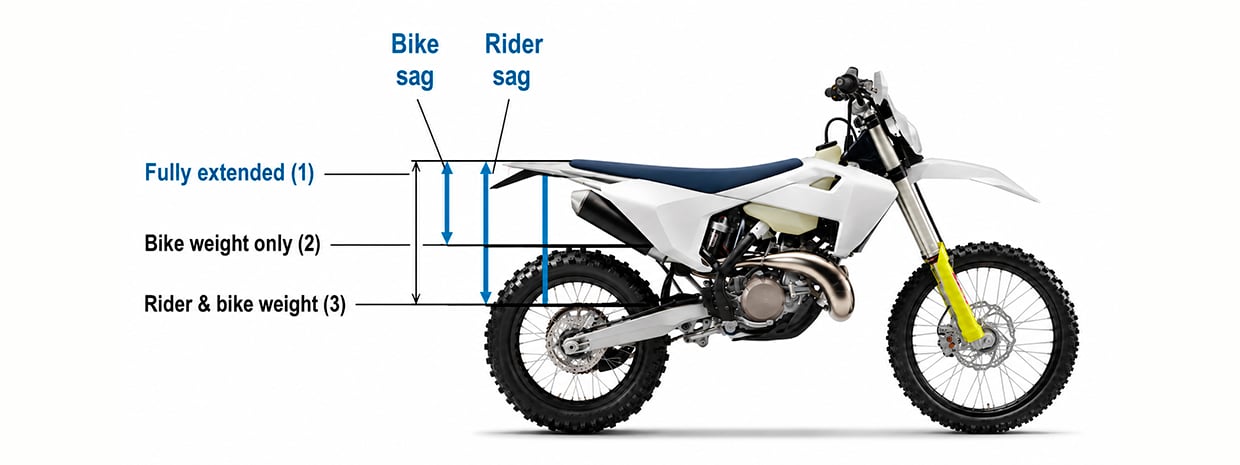
Sag measurement illustration

How to measure sag

First, put the bike on a stand so the rear wheel is off the ground. Measure the distance from the rear wheel axle to a fixed point on the rear fender or frame.

Then take the bike off the stand. Sit on it in full riding gear and take your normal riding position. Ask a helper to hold the bike straight and measure the same distance again.

The difference between these two measurements is your rider sag.

Recommended sag values

Your bike's recommended sag value should always be checked in the owner's manual. As a general starting point, use these ranges:

  • Front sag/fork: around 25–35 mm, or about 10–15% of total fork travel.
  • Rear sag/shock: around 90–110 mm, or about 30–35% of total rear suspension travel.

Always check your owner's manual, because the correct values can differ from bike to bike.

How to adjust sag

If the rear sag is too big, the bike sits too low. Increase spring preload by tightening the preload ring on the rear shock.

If the rear sag is too small, the bike sits too high. Reduce spring preload by loosening the preload ring.

This is one of the most important parts of how to adjust enduro suspension, because sag sets the base position of the bike before you start working with rebound or compression.

💡 Quick tip: front fork sag is usually smaller than rear sag. For many enduro bikes, the front can sit around 70–80 mm under rider weight, but exact numbers depend on total fork travel and the bike's manual.

Step 3. Adjust spring preload

Spring preload is the initial compression applied to the spring before the suspension starts working under the rider's weight. It helps adapt the bike to rider weight, gear, and riding conditions.

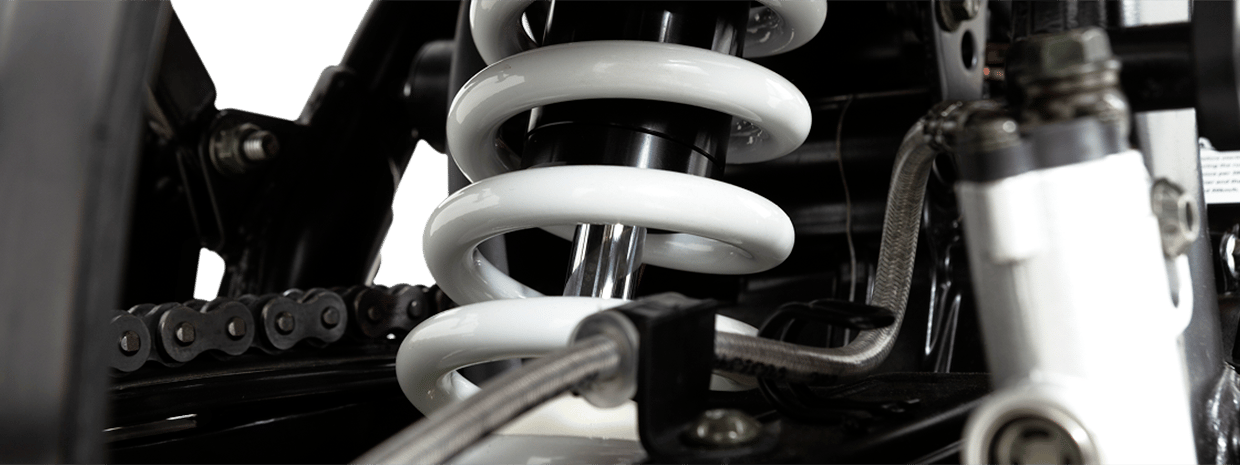
Preload adjustment illustration

☑️ Note: many riders think preload changes the stiffness of the spring itself. It does not. The spring rate stays the same. Preload mainly changes the bike's ride height and sag. When you increase preload, you compress the spring and raise the bike. When you reduce preload, you release the spring and lower the bike.

To adjust preload, you change how much the spring is compressed. On many bikes, this is done with preload adjusters, rings, or spacers, depending on the suspension design.

Front suspension: If your fork has preload adjusters, they are usually located at the top of the fork legs. Turn the adjuster clockwise to increase preload and counterclockwise to reduce it. Make small changes, usually 1–2 clicks or small turns at a time.

Rear suspension: On the rear shock, preload is usually adjusted with a preload ring or collar on the shock body. Use the correct shock spanner and work gradually. This is one of the first steps in rear shock adjustment enduro riders should understand, because preload affects sag before you move on to rebound or compression settings.

Step 4. Adjust damping

After the springs and preload are set, you can move to damping. Damping controls the speed of suspension movement. In other words, it decides how fast the fork or shock compresses and how fast it returns after a hit.

This is one of the key parts of front fork adjustment enduro riders notice quickly, because it changes how the bike reacts to bumps.

There are two main damping settings: compression and rebound.

Step 4. Adjust damping

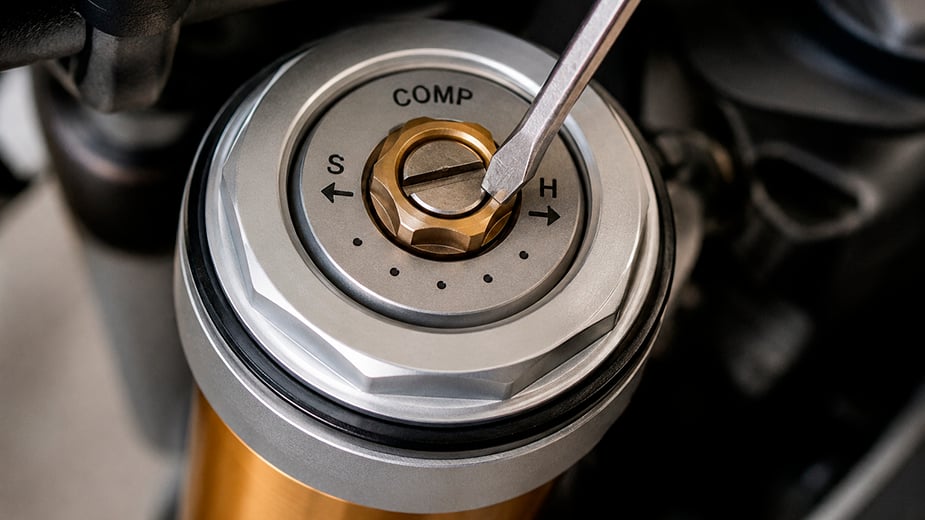
Compression damping: how fast the suspension compresses

Compression damping controls how fast the suspension compresses when the wheel hits an obstacle.

So compression affects the "hardness" you feel while riding. Slower compression can feel stiff because the suspension does not move quickly enough over obstacles. Faster compression can feel softer, but if it is too fast, the suspension may use too much travel too quickly and leave you without enough reserve.

If compression is too soft, the suspension can dive, bottom out, or feel like the bike is falling too deep into the stroke. You may feel this on big bumps, landings, or hard braking.

If compression is too hard, the ride becomes harsh. The suspension does not have enough time to absorb repeated bumps, so the hits go into your hands and body instead. On the front fork, this can feel like the handlebars are fighting you. On the rear shock, the rear wheel can skip off obstacles instead of staying planted.

Rebound damping: how fast the suspension returns

Rebound damping controls how fast the suspension returns to its normal position after compression.

If rebound is too fast, the bike can feel springy. After a jump or hard hit, the suspension may shoot back too quickly, making the bike bounce and lose stability.

If rebound is too slow, the suspension does not return fast enough before the next bump. This is called "packing down." At first, the bike may feel fine, but after several bumps in a row, the suspension starts riding lower in its travel and can begin to bottom out.

For tracks with many small repeated bumps, the suspension usually needs a faster rebound so the wheel can return quickly and keep contact with the ground.

For faster flowing tracks with jumps and big landings, a slightly slower rebound can help the bike return more smoothly and stay controlled after impact.

☑️ Note: the same logic works for the rear suspension, but there is one important rule. The rear suspension should not rebound faster than the front. This is an important rule in rear shock adjustment enduro riders should remember: if the rear kicks back faster than the fork, the bike can become unstable.

How to set the base damping

The base damping settings are stated in the owner's manual. Most bikes have recommended clicker settings for compression and rebound: for example, 10, 15, or 18 clicks from a fully closed position.

To set the baseline, gently turn the adjuster clockwise until it stops. Do not force it. Then count the clicks back out counterclockwise according to the manual.

Do this for front and rear compression and rebound. Write every setting down before you ride. This is the easiest way to return to the starting point if a change makes the bike feel worse.

Rear shock specifics

The rear shock works on the same basic principle as the fork, but it can feel different because of the linkage system and the way the rear wheel moves under load.

Some modern rear shocks also have separate high-speed and low-speed compression adjustment.

High-speed compression works with sharp impacts: rocks, roots, jumps, and sudden hits.

Low-speed compression works with slower bike movement: squat under acceleration, body roll, braking load, and smooth terrain changes.

Step 5. Final tuning and testing

Now let's bring everything together. At this point in the enduro suspension setup guide, you already know what sag, preload, compression, and rebound do. The final step is to test the bike and adjust the setup to your real terrain.

For rough tracks with roots, rocks, and many small hits, the suspension usually needs to work faster. Faster rebound helps the wheel return quickly and keep contact with the ground. Compression also needs to be controlled enough so the bike does not dive or bottom out. But don't make the setup too fast, or the bike can start bouncing and losing stability.

For faster flowing tracks with bigger landings and longer suspension movement, the setup can be slightly slower. After a hard compression, the suspension needs time to return smoothly and control the spring, instead of shooting the bike back up.

The most important rule is simple: adjust only one setting at a time.

  • Don't turn everything at once.
  • Don't go from fully closed to fully open just to "see what happens."
  • From your standard setting, try a bigger change first — around 5–8 clicks — to feel the difference.
  • Ride the same section and understand whether you moved in the right direction.
  • Return closer to the base setting, then make smaller changes: 1, 2, or 3 clicks.
  • Write down every change so you can always go back.

Only after you understand one setting should you move to another. Don't adjust compression and rebound at the same time, because you won't know which change created the result.

Clear testing is the main rule of enduro motorbike performance tuning: one adjustment, one test ride, one clear note. And remember: all of this works only if the suspension is serviced and mechanically healthy.

In general, suspension setup is not as complicated as it looks. You also won't "ruin" the bike by trying. You can always return to the base settings from the manual and start again. But once you begin adjusting the suspension for your own weight, the result comes quickly.

FAQ

10 Jul 2026

Did you like the article?